Crescent Pose
Anjaneyasa

STEPS
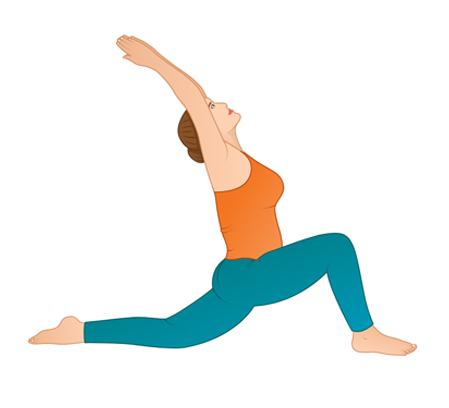
This pose can be approached from a number of different positions, for simplicity begin in a downward facing dog. From Down Dog step the right foot up between the hands, stacking the knee joint directly over the ankle joint. Begin to lower the left knee to the floor while simultaneously sliding it back to allow the hips to move forward and down. Relax the top of the left foot onto the floor. As the pelvis moves down the front of the left thigh will begin to stretch.
Lift the torso to an upright position and reach the arms up overhead bringing the palms together to touch. Hold the posture for several breaths, and then release the hands back down to the floor on either side of the right foot. Lift the back knee and tuck the toes under to step back to Downward Facing Dog. Repeat on the opposite side.
TEACHER QUEUES
VISUALIZATION COMMENTS
Coming into this pose from Downward Facing Dog, visualize the pelvis floating up and forward to gently land with the foot between the hands. Bring the energy up from the floor into the legs to fins buoyancy as the torso lifts away from the floor and the arms reach up to the sky. Feel the continuity of the arc in the body- from the palms, to the front of the chest, and across the front of the hip, down to the knee- stretching out the front side of the body. Maintain the same continuous arc through the back of the body by keeping the lower back and back of the neck lengthened. This posture is ideal for releasing a body that sits all day!
TECHNICAL COMMENTS
While moving into this posture from Down Dog, lift the right knee as high into the chest as possible and then shift the weight forward into the hands before placing the foot down onto the floor. This transition through a ‘turbo dog’ helps to build strength and make the movement of the leg coming forward smoother. Once the foot comes to the ground, press out through the pads of the toes and align the knee evenly over the ankle joint. Gently squeeze the inner thighs towards each other to help activate the pelvic floor muscles and energize moola bandha. Then use the abdominal muscles to draw the pubic bone and hipbones forward and up towards the ribcage. This will create a strong core to balance from and prevent the lower back from over arching. Feel the ribcage floating over the pelvis 3 dimensionally – not popping forward from the hipbones and collapsing in the back. Press down into the front heel to feel the pelvis subtly left. This will create an even crescent shape through the whole front line of the body. Press the collarbones up towards the ceiling keeping the back of the neck lengthened and a slight engagement into the neck flexors at the front of the throat. As the arms reach out, externally rotate at the shoulder joint drawing the shoulder blades onto the back and spiral the forearms to turn the palms in towards each other. As the arms reach overhead, the eye of the elbow (or the inside of the elbow) will turn to face each other. The palms can be placed together or left shoulder distance apart if tightness is present.
BENEFIT COMMENTS
- Stretches the thigh, hip flexor, abdomen, chest and shoulders
- Strengthens the core stabilizers
- Opens the front of the body and allows for the natural curve of the lumbar spine
- Excellent posture to counterbalance hours spent seated and with the arms in front of the body
WATCH OUT FOR
- Front knee moving past the front ankle
- Collapsing in the abdominals and dropping the pelvis
- Ribs popping and lower back sagging
- Shoulders lifted
- Chin jutting forward
CONTRAINDICATIONS
- Be careful with knee problems. It may be appropriate to prop under the knee or shin
- Use caution with students experiencing hypertension or whip lash- don’t bring the hands over the head, instead keep them forward, at the sides, or on the hips
MODIFICATIONS
- Keep the hands on the floor or perform close to a wall for balance
- Hands on hips
- Keep the back toes tucked under to take pressure off the knee
- Place a folded blanket under the back knee for support, or fold the mat for more cushion
- Use a block under the shin to keep the kneecap completely off the floor
- Keep the hands shoulder distance apart
VARIATIONS
- Perform with Horse-face arms
- Tuck the toes and lift the back knee off the mat to come into a high lunge
- Place the palms together in front of the chest and rotate the upper spine bringing the opposite elbow to the front knee, performing a modified Revolved Side Angle Pose.
YOGA COUNTER POSES
- Child’s Pose – Balasana
- Downward Facing Dog- Adho Mukha Svanasana
- Standing Forward Fold- Uttinasana
Written By: Meghan Aris
Certified in several disciplines of yoga, a pilates teacher and teacher trainer, Meghan is continually widening her path of body/mind studies. At a young age she began her journey into body movement through dance. After being diagnosed with Rheumatoid Arthritis, she shifted her practice to more rehabilitative yoga. In this discipline she found not only the resources to heal her body, but also a guide to living a life full of peace and joy. She can be found teaching on any given day at Fix Health Care


