Cow Face Pose
Gomukhasana

STEPS
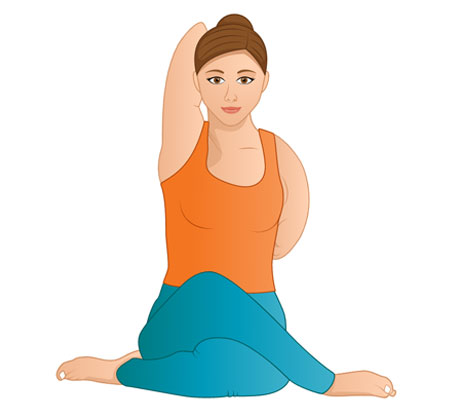
Begin sitting in a cross-legged position or Easy Sitting Pose (Sukhasana). Bring the front leg on top of the bottom leg crossing the knees one on top of the other (note that the knees may not line up completely if the hips are tight). Ensure that both sitting bones are touching the ground (use a prop is necessary). The feet should be approximately the same distance from the hips on either side of the body.
If the right knee is on top, stretch the left arm straight up toward the ceiling with the palm facing back, bend at the elbow to reach down between the shoulder blades. Reach the right arm out to the side of the body and again turn the palm to the back with the thumb facing down. Bend at the elbow and rotate from the shoulder to reach up between the shoulder blades. Clasp the fingers together if it’s available (or use a strap between the hands). Reach the top elbow towards the ceiling and then bottom elbow towards the floor to deepen the stretch. Lengthen up through the spine. Stay in the pose for 1-2 minutes and then repeat with the other leg on top and the opposite arm position.
TEACHER QUEUES
VISUALIZATION COMMENTS
This posture is quite challenging for both the hips and shoulders and therefore it is very important to take time to set up the pose (see the modifications for different props). Encourage students to breath deeply into the pose. Envision the hips like pockets that fill with breath on each inhale and then relax with each exhale. Try to feel the entirety of the spine coming into alignment as you lift from the sitz bones. Invite the shoulders to soften and the neck to grow long as though being lifted from the ears.
TECHNICAL COMMENTS
There is always something to work on in this posture. Ideally the student will have both sitz bones weighted evenly, a block can be a great help here if one side is lifting off of the floor. Engage the feet slightly to avoid rolling the ankles and to maintain good ankle knee alignment. Ensure that the ribcage is resting over the pelvis three dimensionally- i.e., the back the ribs line up with the back of the pelvis and the front of the ribs line up with the front of the pelvis. Due to tightness in the chest and shoulders, many students will pop the ribcage forward in order to link the fingers behind their back. Try to keep the elbows close to the body and the ears in line with the shoulders.
BENEFIT COMMENTS
- Opens the hips- especially beneficial for tight IT band and gluteals.
- Opens the shoulders- especially targeting tight rotator cuff muscles.
- Opens chest and thighs
- Stretches the triceps
WATCH OUT FOR
- Sitz bones lifted
- Ribcage popping forward
- Head pushing forward
- Straining in the shoulders and neck
CONTRAINDICATIONS
- Proceed cautiously with students experiencing shoulder injuries or neck problems
MODIFICATIONS
- Sit on a block, cushion or bolster if the sitting bones don’t make it to the floor
- Prop under the ankles or knees to decrease any discomfort at these joints
- Use a strap between the hands if the fingers do not touch *this is very common and it’s a good idea to offer the strap before entering the pose
VARIATIONS
- To increase the stretch into the hips and back, hinge forward at the hips to lay the torso over the top of the thigh
- Perform the above variation with the arms released and supporting the body on the floor in front of the knees
- Release the arms and perform gomukhasna legs with the upper body in a side stretch. Place one palm down on the floor beside the body, reach up and over with the opposite arm and stretch towards the hand on the ground making a gentle arc with the upper body. Repeat on the opposite side. Change legs and repeat again.
- Perform a simple twist with the upper body only. Place one hand on the floor behind the hip, lengthen the spine and rotate towards the hand on the floor, looking over the shoulder (as in Bharadvaja’s Twist). The other hand can hold at the ankle or shin to support the twist. Repeat on other side. Change legs and repeat again.
- A fun variation for transitioning from one side to the other can be found by performing the posture as previously explained on one side of the body and then coming into a standing position with the legs still crossed. Turn the body in a circle leaving the legs crossed. When you arrive facing forward again the other leg will be in front and you can sit back down into the pose to repeat it on the other leg.
YOGA COUNTER POSES
- Seated Forward Bend- Paschimottanasana
- Head-to-Knee Forward Bend- Janu Sirsasana
- Marichyasana III
- Half Lord of the Fishes Pose- Ardha Matsyendrasana
- Eagle- Garudasana
- Wide Angle Seated Forward Fold- Upavistha Konasana
Written By: Meghan Aris
Certified in several disciplines of yoga, a pilates teacher and teacher trainer, Meghan is continually widening her path of body/mind studies. At a young age she began her journey into body movement through dance. After being diagnosed with Rheumatoid Arthritis, she shifted her practice to more rehabilitative yoga. In this discipline she found not only the resources to heal her body, but also a guide to living a life full of peace and joy. She can be found teaching on any given day at Fix Health Care


